GCD-Elements

Create a Card with Multiple Images

You have several actions that are designed to create a card using multiple images. These actions include...

  • L8x9Pano 2 Windows  (uses 2 images)
  • L8x9Pano 3 Windows   (uses 3 images)
  • L8x9Pano 3 Platinum Windows   (uses 3 images)

These actions work with the currently open files.  Close all other image files before you run the action. 

Open all images you want to use for a greeting card.  These should be flat images.  (i.e. use a JPG image or a flat Photoshop file with only a background layer.) 

With the last image opened being the active image, on the Create Cards panel select the Multi-Image button you want to run and then click the button. 

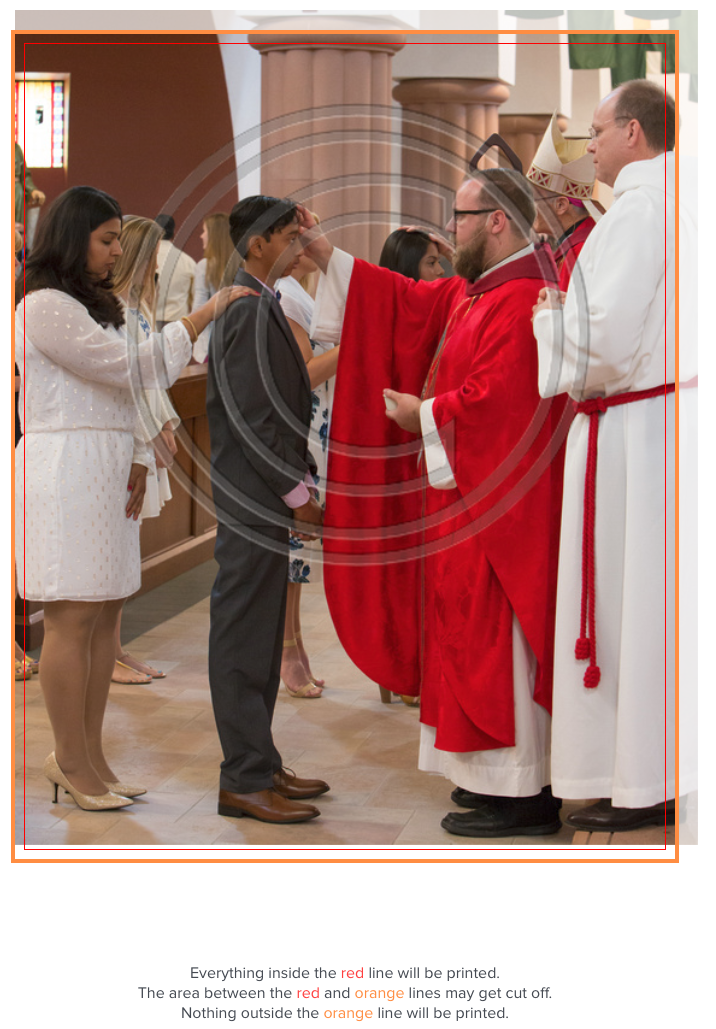
The Action will stop prompting you with the crop tool.  Drag the crop lines to trim the image the way you want it to appear on the card.  

Commit the crop and the action will continue.

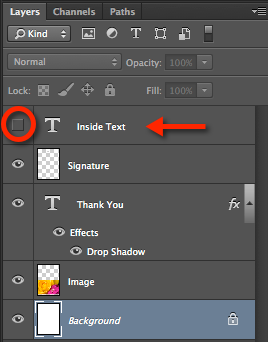
When the action is complete you will have a layered greeting card file.  I suggest that you immediately save the file using File > Save As… and give it a meaningful name. 

You may also want to modify the font to select a phrase and font style that matches the card design that you envision.

Printing Text Inside a Card

First, why only text inside the card?

Photo inkjet paper has a special coating that helps the ink lay on the page properly and helps produce nice crisp images.  Most papers are only coated on one side.  With such papers, you can only print photo quality images on one side.  Images printed on the uncoated side do not look very good but text prints very well.

There are a few papers that you can find that are actually coated on both side.  With these you can print photo quality images on both sides.

How to print text inside a card.

In the latest version of the Greeting Card Designer, I've included a Text layer that is aligned for printing on the inside panel of a greeting card.  By default, the layer is invisible - i.e. the eyeball is turned off  (See red circle at right).  To add text to the inside of a card, simply turn off every other layer and turn on the Inside Text Layer.  That should be the ONLY layer visible.  

You'll find some default text which you'll want to change.  You also may want to change the color, size or font used for the text.   

Printing the Greeting Card with Inside Text

Before you run off head long into printing there are a few things that you must consider first – it will make the entire print process less frustrating.

Greeting card paper is generally coated on only one side.  This means that the photographic image must be placed on the coated side or the quality of the image will degrade sharply.  
Red River Paper packs their paper with the coated side up.  Study the paper so that you can recognize the coated side. 

When you print an image using an inkjet printer, the moisture in the ink softens the paper and may cause it to temporarily curl.  It is best to print the inside text first and then print the outside image and text.  Be sure to print the inside text on the uncoated side of the paper. 

Loading the Card Stock in Your Printer

How you load the greeting card stock depends upon how your printer is designed.  The best suggestion is to print a couple of trial cards and just pay attention to which side prints and which end comes out first. To figure this out, use a pencil to mark an arrow on the top of the paper when you load it into your printer. Then pay attention to where that arrow is on the printed product.

To print a card with inside text, load the paper so that the first pass prints the inside text on the non-coated side of the paper.  Pay attention to where the text is printed.  Now, flip the paper over and print the image or outside of the card.  The image will print in the same location as the inside text. 

Printing Your Card

Printing Greeting Cards is certainly not difficult but it can be confusing the first couple of times. The reason is that when you print anything from Photoshop you actually use a separate program called a Printer Driver and driver interfaces are all different.  The example below is from an Epson R800 but you’ll find similar options on any driver.

  • Specify the type of paper.  See the red flyer that came with your paper for help.
  • Define the print quality.  See the red flyer that came with your paper for help.
  • Specify the paper size.  Many greeting cards are not standard sizes so you must enter the dimensions manually.  In the case of the Epson driver, click the drop down menu and select User Defined.  Enter the dimensions of the unfolded paper stock.  Use the shortest dimension for the width and the longer dimension for the height.
  • Specify the paper’s orientation.  (i.e. how the image canvas is oriented in Photoshop.)  Note that this is NOT the orientation of the image on the card.  For a card where the final folded image is in a portrait orientation, you would specify Landscape.
  • The Epson Driver allows you to save your settings so you may want to save your settings.  Use a name you’ll remember like “Red River 6.25x9 Card”.

The Actions

There are 35 different actions provided that helps you design different size and styles of greeting cards.  Some of these actions MUST be run against a flat image file, while others must be run against greeting card files that have been created by another action.

NOTE:  If you are not used to running actions from Photoshop you need to be sure that you do not accidentally change any of the modal controls.  These controls are indicated by the red dialog box icon to the left of the action name.  Modal controls are not visible in Button Mode.  

Standard Greeting Card Actions

The first group of actions, called the standard actions, creates greeting cards in a variety of sizes and orientations.  These are divided into landscape and portrait orientation designs – Color coded blue and green when the Actions Palette is in Button Mode.

The naming convention used includes a letter to indicate orientation.

  • L = Landscape
  • P = Portrait

and the dimensions of the greeting card stock.  This is the unfolded stock size and not the final folded card size. 

Multi-Image Actions

When running these actions you must open the appropriate number of images before you run the actions. To ensure these actions run properly follow these steps;

Close all images that are currently open for edit.
In the Bridge, select the appropriate number of images that you want to include in your card. 
Open those in the order in which you want them included on the card.  In the card on the right, the first image opened is the left image, then the middle and finally the right side image.  
In Photoshop you can see the order in the image tabs on the top of the desktop are.  Also, in Photoshop you can now rearrange this order by simply dragging the tabs.  
Make sure the last image opened is the currently active image and then run the action. 
The multi-image actions create cards that already have appropriate borders, drop shadows etc.  You are not able to run the Border Actions on multi image cards.

Border Actions

This set of six actions adds a distinctive border or edge to your greeting card.  They MUST be run on a greeting card file that was created by one of the standard actions above but they are not compatible with the multi-window cards.  

  • Border 5 – Adds a 5 pixel black border around the image
  • Border 15 – Adds a 15 pixel black border around the image
  • Border 25 – Adds a 25 pixel black border around the image
  • Border Torn Edges – Gives the edge of the image a torn look
  • Border Over Spray – Gives the edge a spray painted look
  • Border Faded Splatter – Gives the edge a rougher splatter look)
  • Border Splatter – Gives the edge a rougher splatter look
  • Border Brush – Gives the edge of the image a brushed look
  • Border Soft Edge – Softens the edge of the image
  • Drop Shadow – Adds a drop shadow to your image.  (This is not the same as simply adding a Drop Shadow layer style.  This action resizes the image to ensure the drop shadow does not encroach on the unprintable margin.

Specialty Actions

This last set of actions gives your greeting cards some stunning visual effects.  

  • Window Portrait – Run this action on a greeting card that was created with any of the portrait orientation standard actions.  
  • Window Landscape – Run this action on a greeting card that was created with any of the landscape orientation standard actions.
  • Album Page – This action may be run against a greeting card file that was created with any of the standard greeting card actions. 
  • Specialty 7x10 Reflection P – This is a very special action that must be run on a flat image file. It will create a 5” x 7” vertical greeting card using your image and will create what looks like a mirror reflection of your image.  
  • Specialty 7x10 Reflection L – This is a very special action that must be run on a flat image file. It will create a 5” x 7” horizontal greeting card using your image and will create what looks like a mirror reflection of your image.