First, why only text inside the card?
Photo inkjet paper has a special coating that helps the ink lay on the page properly and helps produce nice crisp images. Most papers are only coated on one side. With such papers, you can only print photo quality images on one side. Images printed on the uncoated side do not look very good but text prints very well.
There are a few papers that you can find that are actually coated on both side. With these you can print photo quality images on both sides.
How to print text inside a card.
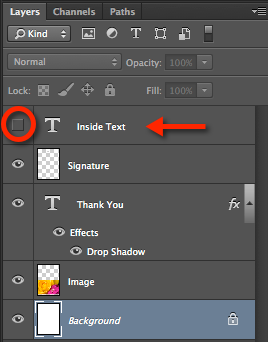
In the latest version of the Greeting Card Designer, I've included a Text layer that is aligned for printing on the inside panel of a greeting card. By default, the layer is invisible - i.e. the eyeball is turned off (See red circle at right). To add text to the inside of a card, simply turn off every other layer and turn on the Inside Text Layer. That should be the ONLY layer visible.
You'll find some default text which you'll want to change. You also may want to change the color, size or font used for the text.
Printing the Greeting Card with Inside Text
Before you run off head long into printing there are a few things that you must consider first – it will make the entire print process less frustrating.
Greeting card paper is generally coated on only one side. This means that the photographic image must be placed on the coated side or the quality of the image will degrade sharply.
Red River Paper packs their paper with the coated side up. Study the paper so that you can recognize the coated side.
When you print an image using an inkjet printer, the moisture in the ink softens the paper and may cause it to temporarily curl. It is best to print the inside text first and then print the outside image and text. Be sure to print the inside text on the uncoated side of the paper.
Loading the Card Stock in Your Printer
How you load the greeting card stock depends upon how your printer is designed. The best suggestion is to print a couple of trial cards and just pay attention to which side prints and which end comes out first. To figure this out, use a pencil to mark an arrow on the top of the paper when you load it into your printer. Then pay attention to where that arrow is on the printed product.
To print a card with inside text, load the paper so that the first pass prints the inside text on the non-coated side of the paper. Pay attention to where the text is printed. Now, flip the paper over and print the image or outside of the card. The image will print in the same location as the inside text.